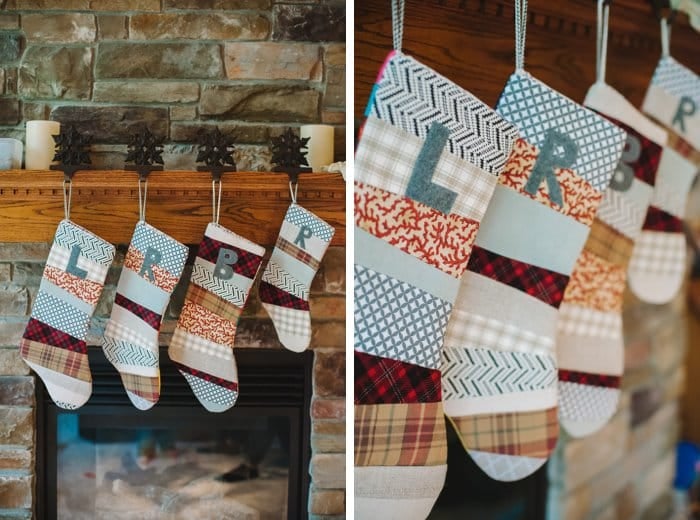
Learn how to make patchwork Christmas stockings that are lined and have a monogram, in this DIY tutorial! You can easily sew your own reversible Christmas stockings that are traditional on one side, and colorful on the other!

Every year, as the leaves turn colors and begin to fall to the ground, I start thinking about Christmas and my crafting desire goes into overdrive.
One year, it was knitting scarves. Another year, it was sewing infinity scarves. Last year, it was sewing zippered pouches. I can hardly control myself; I become a possessed crafter that sometimes has trouble falling asleep because I want to MAKE ALL THE THINGS!
This year, I kicked off my Christmas crafting craze with some projects in honor of the new grandbabies that are a part of our family now. We celebrate Christmas Eve at my parents house, and part of the tradition is taking home a loaded stocking to open on Christmas morning. Now that there are three grandkids and one grand-puppy in the family, I thought it would be fun to make some custom stockings.
After surfing around on Pinterest, I decided I wanted to try my hand at making patchwork stockings, and my goal was to use fabric that I already had in my stash. No heading to JoAnn Fabrics because that has the opposite effect; I come home with MORE fabric, rather than using up what I have and decreasing my stash.
I also decided that I wanted to have a little fun with these stockings. I wanted to make one side with traditional winter/Christmas fabrics; this would be the side that my mom displayed during the holidays. But I thought it would be fun for the other side to be bright and colorful for the kids [and dog.]
After some research online, I got to work!
I snapped cellphone photos of my process. There are hundreds of tutorials online, many better than mine I'm sure. But I did my best to show how I made them.
I LOVE how the finished products turned out. I dare say they are some of my most favorite things I've ever sewn!
How to Make Patchwork Christmas Stockings that are REVERSIBLE
Supplies needed:
- Pattern for stocking
- Fabric for outside patchwork
- Fabric for inside lining
- Fusible interfacing to add sturdiness [optional]
- Felt for monogramming name or initial [optional]
- Rope, twine, ribbon or other material for hanging loop
- Sewing machine
- Thread
- Scissors
- Cutting mat and rotary cutter
- Iron
Step 1: Create stocking pattern
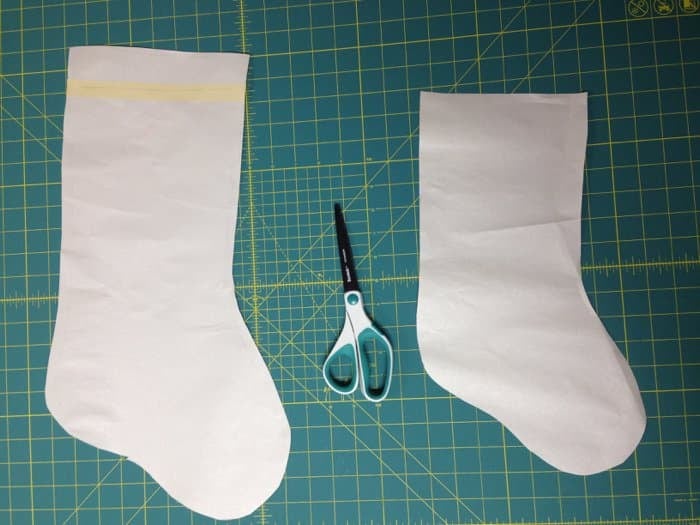
I used a Christmas stocking I had at home to create my pattern pieces. I wanted to make three large stockings for the kids and one smaller one for the dog, so I traced and cut out two different pattern pieces.
Step 2: Cut out fabric to use as a background
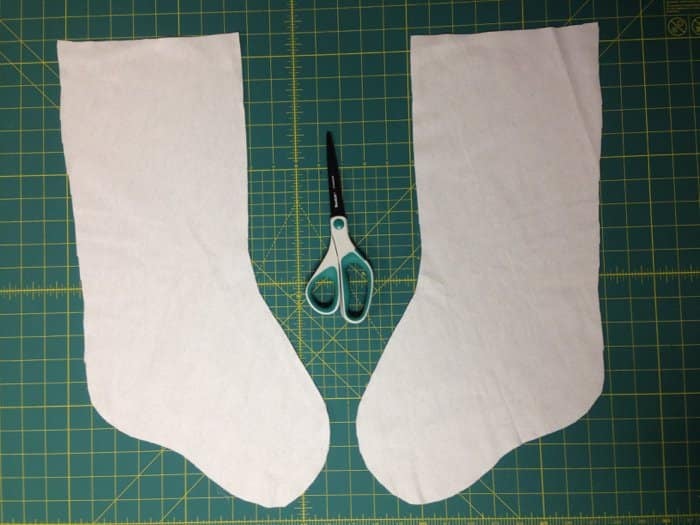
I used white flannel fabric that I had in my stash to serve as the background pieces for my patchwork. This are the pieces that I would be sewing my patchwork scraps to, and would ultimately form the outside pieces of my stocking.
Cut two pieces of this background fabric for each stocking you want to make. The two pieces below will form one finished stocking.
Mark which side is going to be the patchwork side. This is an important step.
You need to make sure that when the two background pieces have patchwork sewn onto them and are ready to be sewn together, they match up to form a stocking.
One stocking piece that you mark should have the toe pointing to the right and one stocking piece you mark should have the two pointing to the left.
Step 3. Gather your fabric scraps and cup into rectangles
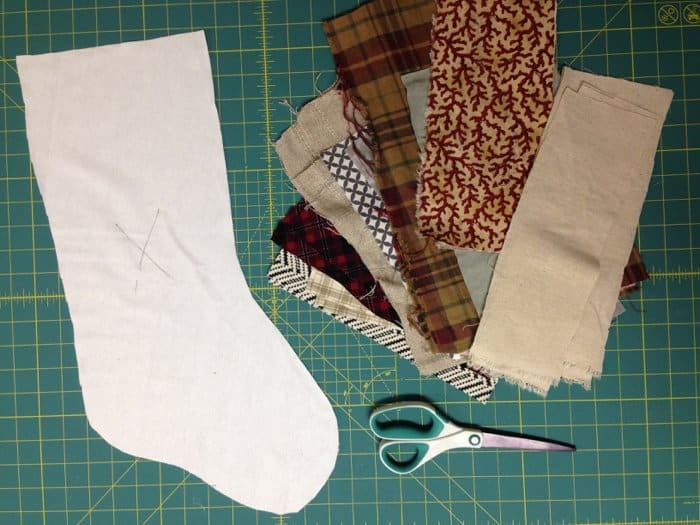
Gather a variety of fabric scraps in the colors and patterns you want to use.
To make things easier, I cut them into rectangles that were all as wide as the stocking but varying heights.
Step 4. Begin sewing strips on for the patchwork
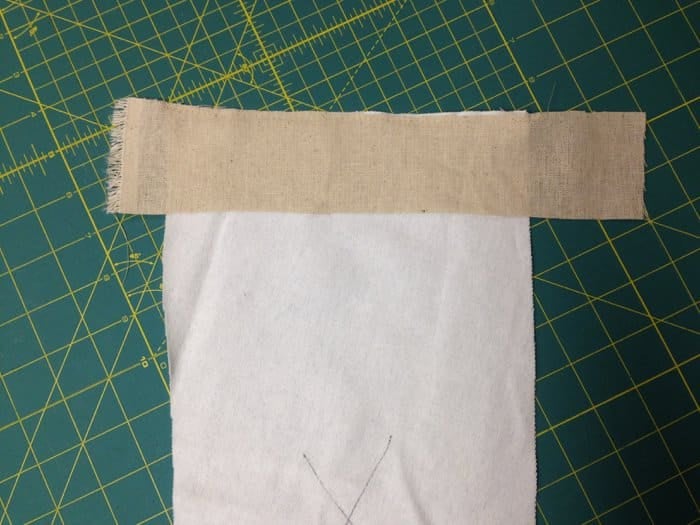
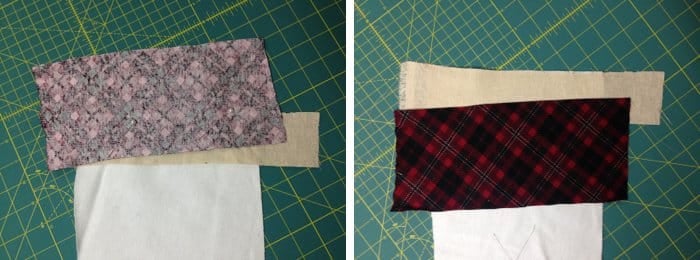
Pick a strip for the top of your stocking.
Lay it along the top of your background piece (good side up), and sew along the top, as close to the edge as you can - maybe ⅛". This creates your first piece of the patchwork.
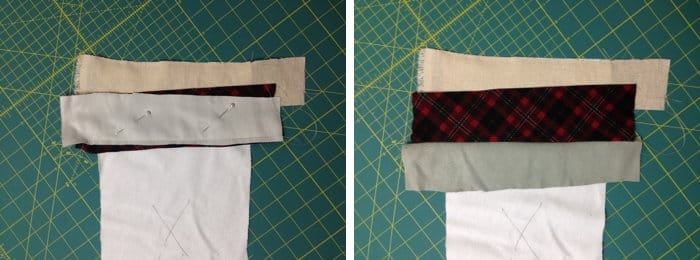
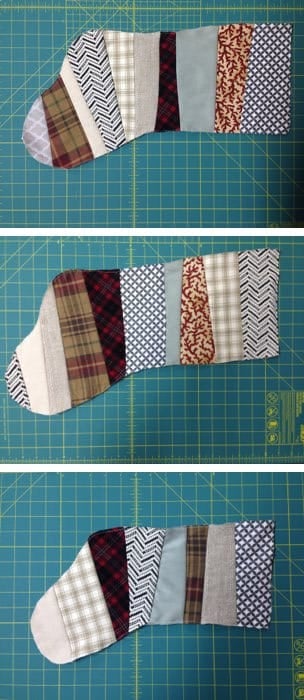
Next, take your second strip, and lay it on top of the first, upside down (bad side up -- see photo below for example.) The right sides of the two pieces should be together.
I decided to create my stocking with an uneven, skewed look to my pieces. I liked the varied look of the pieces, rather than having everything all perfectly horizontal and even. You can decide how you want your pieces to look; if you want it even, lay the second piece horizontal. If you want it varied, angle it a bit.
Pin the second piece in place [if you want] and sew along the bottom edge of the second strip. Your seam allowance doesn't matter too much; I used about ¼".
Once your second strip is sewn, fold it down and press with an iron.
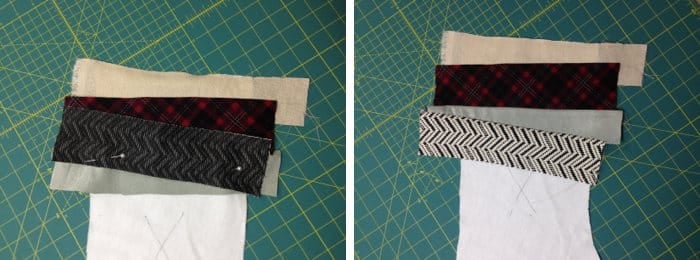
Repeat this process with a third strip of fabric.
Place upside down, on top of the second strip and pin. Sew along the bottom. Fold down and press. This forms your third piece of the patchwork stocking.
Continue with strip #4, either at an angle or straight.
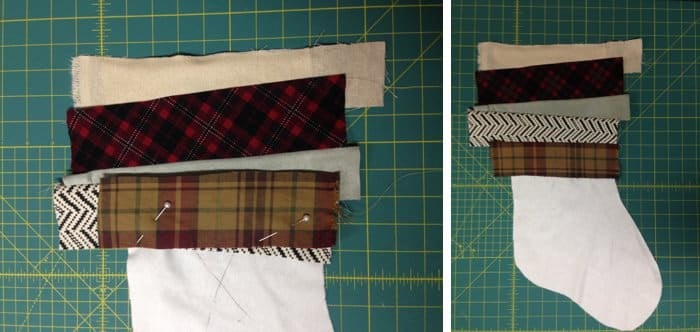
Continue with strip #5.
Repeat this process, sewing strips on one at a time, until you have covered the entire background piece.
Step 5. Trim strips and sew along the stocking edge
Once you've sewn on all of the strips for your stocking, flip it over so you see it from the back. I forgot to take a picture of this specific step, but what you'll see is your background piece and then the edges of your scraps sticking out on either side of it.
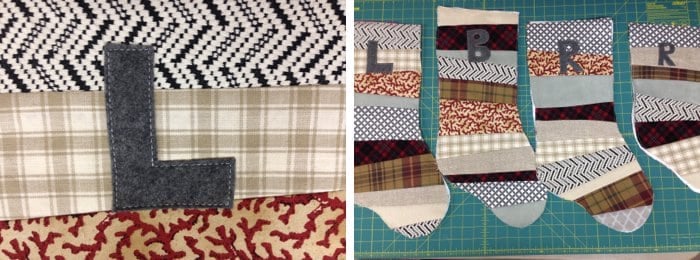
Trim around the edge of your background stocking piece. This will give you the front of your stocking!
Sew around your stocking, as close to the edge as you can [⅛" or so] to secure the strips and prevent the seams from unraveling.
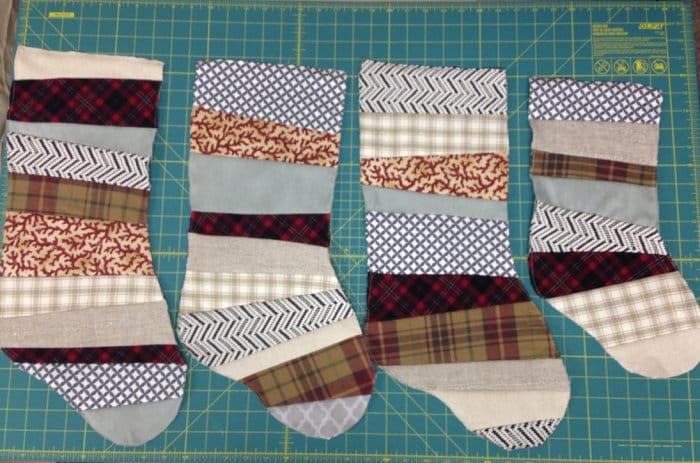
The photos below show the four different stocking fronts I made. I used the same fabrics in all of them, but in different sizes and orders.
Three big stockings and one Remy-sized stocking.
Step 6. Repeat the process to create a patchwork piece for the other side of the stocking.
Using the second background piece you cut in step 2, create another patchwork piece.
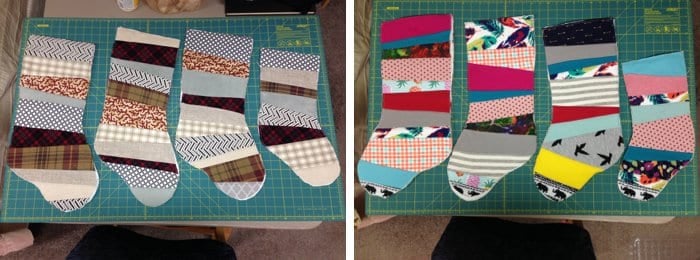
I used fun, bright colors and patterns for this side because I wanted the stockings to be Christmasy on one side and kid-friendly on the other. [See photos below.]
You could make an identical piece using the same fabrics in the same strip size and order as your first piece. Or, you could use the same fabric but vary the order; giving your stocking consistency but still being creative. Or, you could create two completely different stocking faces like I did.
The choice is yours!
Step 7. Cut interfacing for 2 patchwork pieces and fuse
If you want to use interfacing to make your stocking more sturdy and heavy duty, cut a piece for each of the two patchwork pieces. I cut mine about ½" smaller all the way around to make it easier to sew later. It reduces bulk because I'm not sewing through all that extra interfacing when I sew the pieces together.
I used fusible interfacing that irons on.
Iron interfacing on to all stocking pieces if you are going to use it. (Read step 8 before you iron it on though, if you think you want to add a monogram.)
Step 8. If desired, cut and sew a felt letter to the front of the stocking piece.
I did this only on the Christmas side, but you could add a letter to both sides so it can be hung facing either direction if you want to.
Also, I added these letters after I had already attached the interfacing; I didn't think of it until after the interfacing was already ironed on. It worked fine to sew them on after the interfacing was already attached, but the proper order is probably to sew the letters on before fusing the interfacing to the back of the completed piece. But again, it really doesn't matter as long as your machine will be able to sew through all of the layers.
Step 9. Cut 2 lining pieces
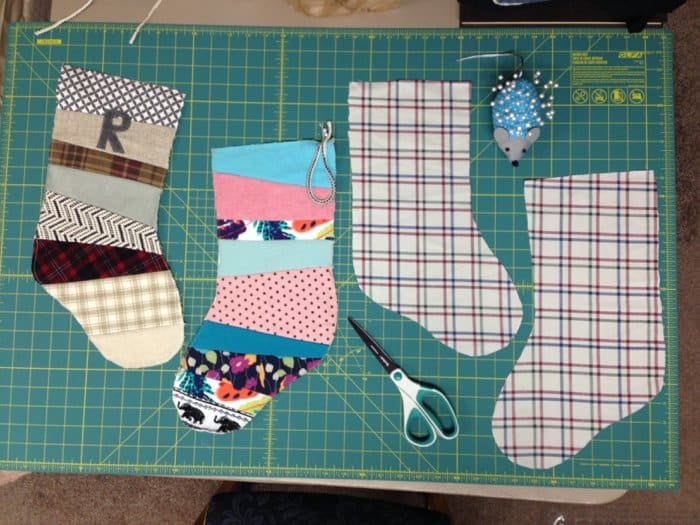
Just like how you cut 2 background pieces in step 2, you want to cut two lining pieces using whatever fabric you choose. You want one piece going each direction (toe pointing right and toe pointing left) like shown in the next photo below.
Step 10. Cut a strip of loop material and pin to outside-back piece.
I decided to use some rope-like yarn I had for the loop. You can use rope, cording, twine, ribbon or sew your own fabric strip to use as a hanging loop.
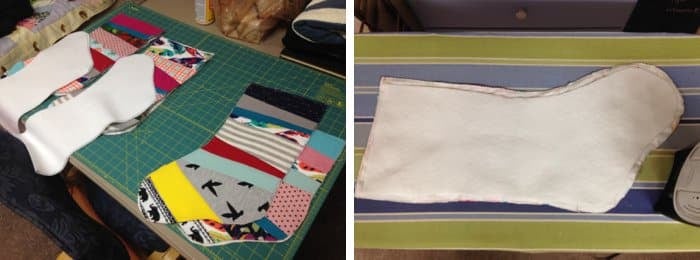
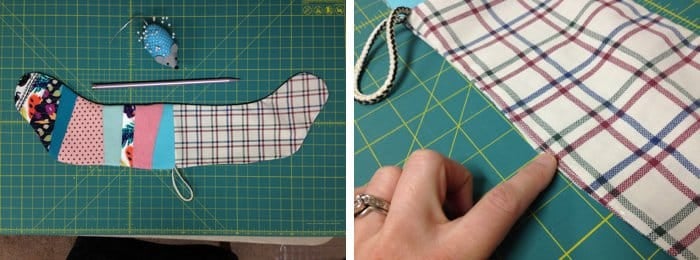
As you can see in the photo below, these are the pieces needed for my stocking, from left to right:
A. The monogrammed front patchwork piece for my stocking, with fusible interfacing ironed onto the back of it.
B. The back patchwork piece for my stocking, with interfacing on the backside. I pinned my loop material to the top outside corner of the back piece, as shown.
C and D. Two opposite lining pieces.
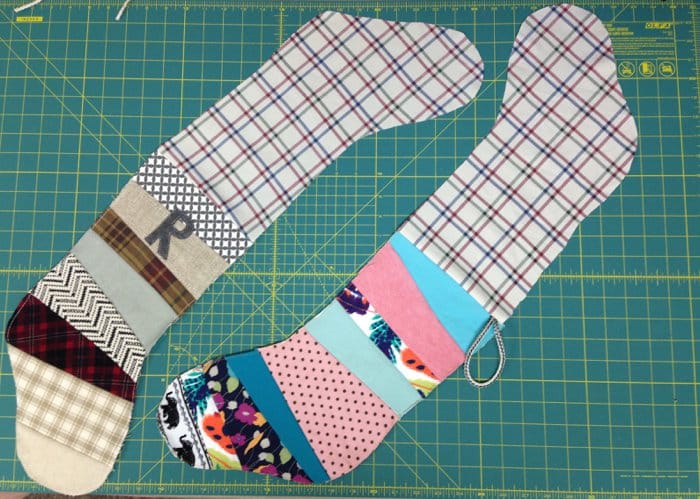
Step 11. Lay a lining piece on top of a patchwork piece, right sides together, so they line up.
Repeat for the other lining and patchwork piece. Pin together.
Step 12. Sew along the top of the stocking.
For most of my sewing, unless otherwise specified, I used a roughly ¼" seam allowance.
Sew along the top of the stocking, connecting the patchwork piece to the lining along the top.
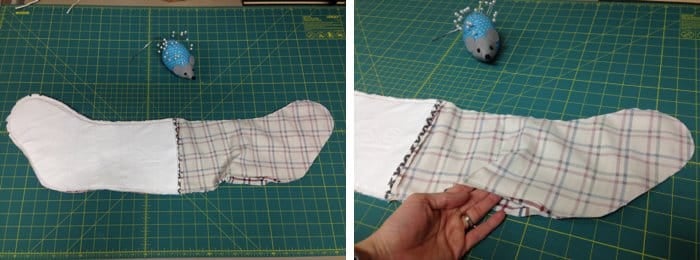
Step 13. Open up and press flat.
You should now have two pieces that look like the photo below.
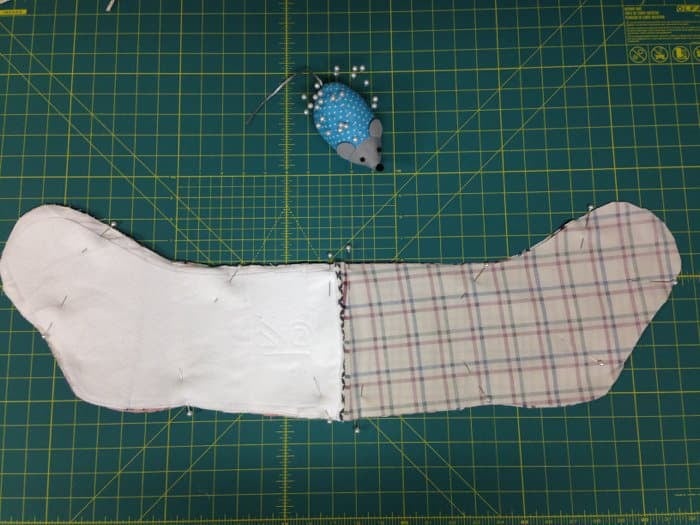
Step 14. Lay these two pieces on top of each other, right sides together.
Once the two pieces are ironed flat, you can lay one of them right side up on your table, and then lay the second piece right-side-down on top of it. The patchwork sides should be facing each other and the lining pieces should be facing each other.
Make sure the hanging loop is tucked in toward the center of the stocking so that you don't accidentally catch it when you sew around the edges.
Pin pieces together like show below.
Step 15. Sew around the edge, leaving a 5 inch section in the lining open.
This is one of the only parts in this project that your seam allowance is really important.
On the patchwork part, you want to sew with a large enough seam allowance so that you won't see your stitching line from when you sewed around your initial patchwork pieces.
I suggested you use a ⅛" seam allowance for sewing around the stocking at the end of step 5.
Here, especially on the patchwork side, use at least a ¼" seam allowance, maybe even a little larger like ⅜". You should be able to see the seam from where you sewed around your patchwork, so make sure you stay toward the center of the stocking from that line, and you'll be good.
On the lining side, I increased my seam allowance slightly to be closer to ½" so that the lining would fit better inside the finished stocking without bunching.
Sew around the edges, leaving a 5" gap in the lining. This will be the hole you turn it right side out through.
I find it especially helpful whenever I'm leaving a hole to turn things right side out through, to make sure I backstitch solidly at the beginning and end of the turn-hole, so that the edges of the hole don't unravel when I'm pulling fabric through it.
Step 16. Turn stocking right side out.
Very carefully, turn the stocking right side out through the turn hole.
I used a large knitting needle to help me do this.
Work slowly and carefully.
Step 17. Press flat and sew the turn-hole closed.
Once you've turned the stocking all the way right side out, press it flat with an iron.
Next, sew the turn-hole opening closed.
You can do this with a ladder stitch that will be invisible if you do it well.
Or, you can do what I did - sew a regular seam with your machine in thread that matches the fabric, as close to the edge as you can. This is by far the easier and faster way, and because the lining gets pushed down into the stocking, the seam doesn't show at all.
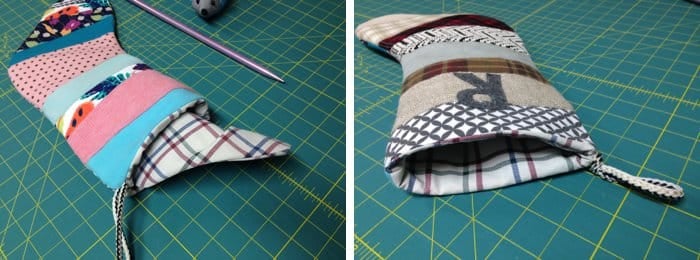
Step 18. Push the lining down into the stocking.
This was one of the most satisfying parts of the whole project for me.
Once I pushed the lining down into the patchwork part, it looked like a real stocking! I was like, "Yes, I did it! It actually turned out!"
**I tied a knot in the rope loop on this stocking [the smaller one that I made for my dog] because I thought the loop was a little too long. On the other three larger stockings you'll see below, I left the loop unknotted.
Step 19. Press the finished stocking flat
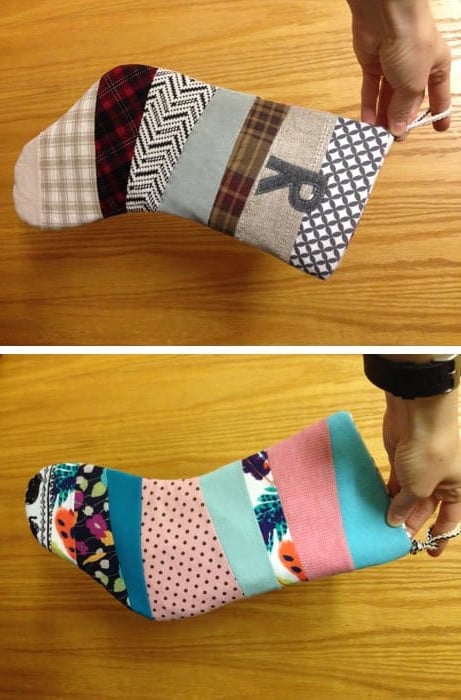
Left: the front of my dog's stocking [Christmasy] // Right: the back of my dog's stocking [Fun]
Step 20. Hang up your DIY Christmas stockings and admire!
I am so happy with how these stockings turned out.
It's always a bit of a gamble making something new, and I had only ever made one small stocking in my life before these.
But I am so pleased and proud of how they turned out! I took my time and I think it shows.
I usually get a little sloppy toward the end of some of my projects, especially after they've taken awhile, because I get tired and ready for something new. But I didn't with these; I was deliberate all the way through.
The design of these stockings can be varied in countless ways as long as you end up with two outside pieces to make your stocking with.
You can use whatever colors, patterns and types of fabric you want, or get really creative and sew creative designs or pictures using felt!
The sky is the limit for customizing these stockings.
Happy sewing!
– If you liked this post, I would love if you would share it on Pinterest or Facebook. Thanks & xo! –







Lacey
I just started sewing and this was my second project (1st was kitchen window curtains - straight lines ). I found the instructions to be easy to follow, and I love the finished product.
Thanks!!!
Laura
Hi Lacey!
Thank you so much for your sweet comment and words of encouragement! I am thrilled and impressed by your sewing journey, and your courage to do these stockings as your second project ever! I hope these are only to beginning to lots of fun projects in the future.
You've made my day!
Laura
Penguinscraps
Read through this twice and remembered some flannel scraps I had from quilts made years ago. Love how these turned out and “sew” easy following your tutorial! Thank you! I would post a pic if I knew how.
Laura
I'm so glad you liked it and it worked out for you!!
Susan
Great tutorial! Read and reread as you work your way through the steps in the process. Everything made perfect sense. Not quite finished the stocking yet. I have the front, back and lining ready to go and will switch tutorials so that I can add a "collar" at the top. Thank you!
Laura
Hi Susan!
Thank you so much! I'm glad you liked the stocking tutorial and it was helpful to you in preparing and making your stocking!
If you have a photo of the finished product, I would love to see it if you care to share!
Merry Christmas!
Laura
Michele
Very Cute! I especially like the reversible idea. You make it sound easy though I am confident it isn't as easy as you make it sound. You did a great job!
Laura Radniecki
Thank you, Michele! It's definitely doable, just takes awhile to make. But a super fun project!! Give it a go! 🙂