
A step by step tutorial on how to make wine glass charms that look like bundles of grapes! The perfect DIY handmade gift, party favor, or fun project just for your kitchen!

I purchased all of the supplies for these charms at Fire Mountain Gems & Beads. My aunt, who initially showed me these beauties, buys all of her supplies through them too.
However, you can find the supplies on Amazon, which is where I linked the supplies from.
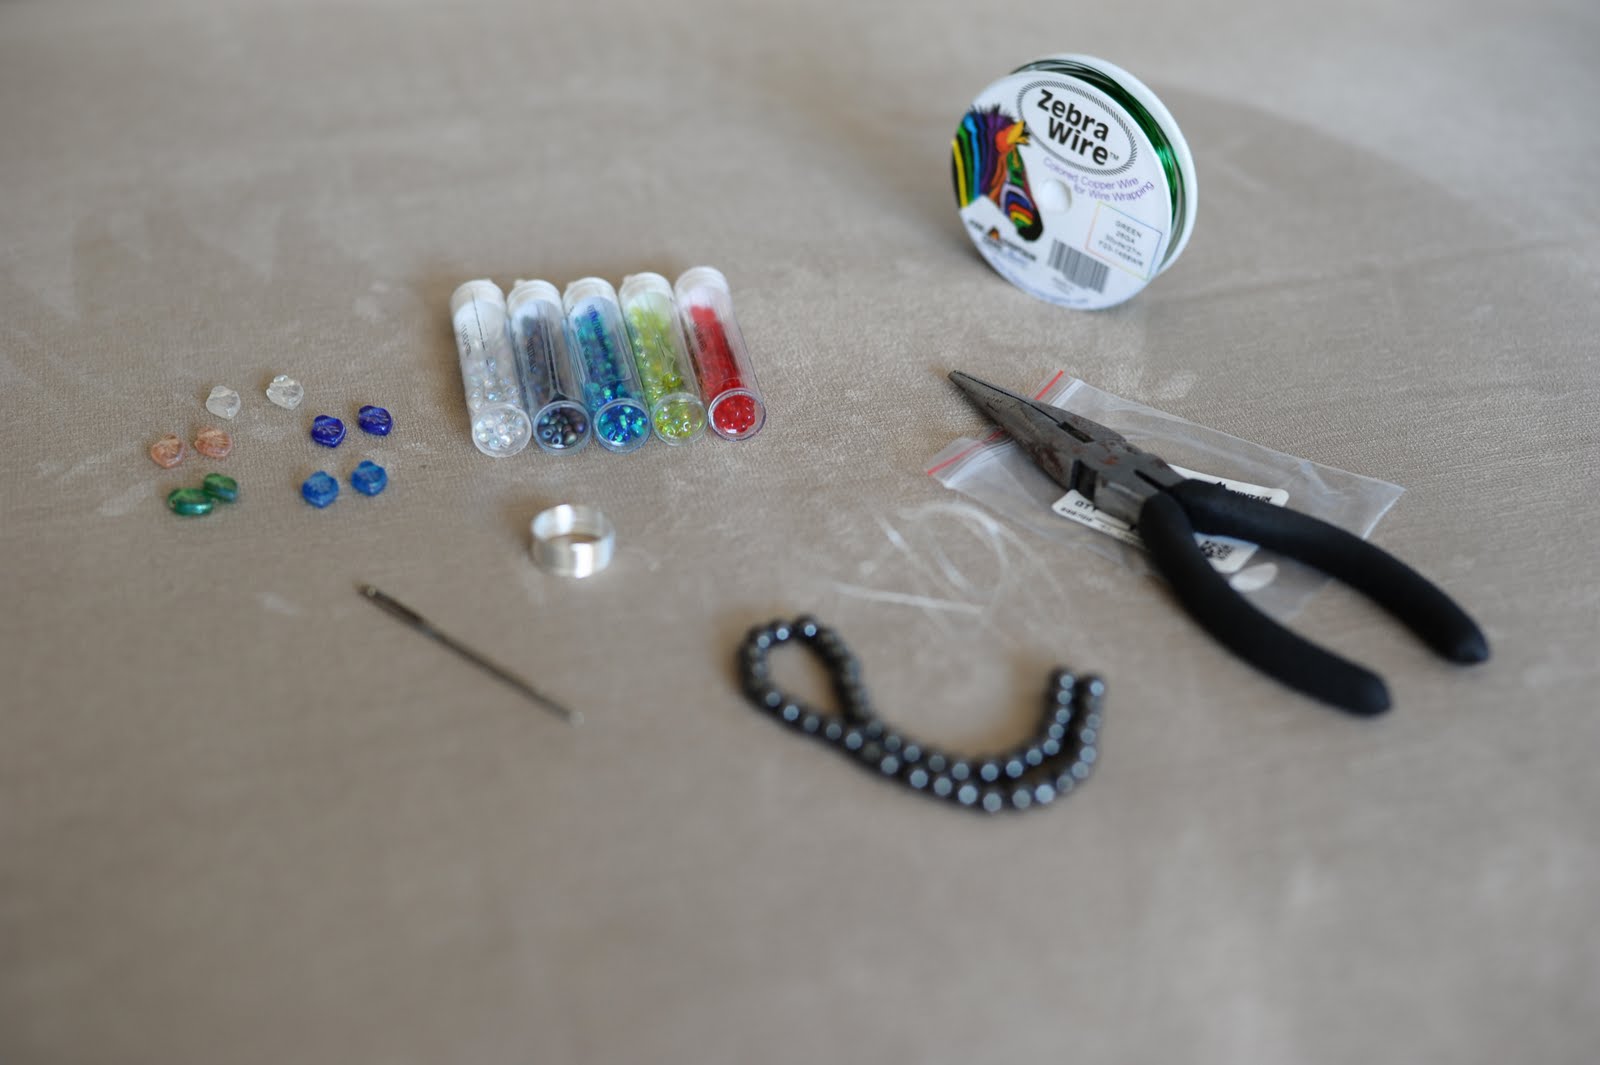
Supplies needed for Bundles-of-Grapes Wine Glass Charms:
1. Green Zebra Wire, 26 gauge.

2. A needle nose pliers.

3. Magnetic beads.
I bought 6 mm beads, but if they had 5 mm, I'd probably get them next time. 6 mm works, but I'd prefer a slightly smaller size.

4. A thick needle.
Mine is a darning needle. The size doesn't really matter, but a couple millimeters in diameter is good.
5. Memory wire, which is the small coil of silver wire.
Memory wire means that it'll keep it's shape, even if you stretch it out [to some extent.] These come in the little coils, and I bought ¾ inch coils of memory wire.

6. Beads for Leaves.
I bought a pack of 100 multicolored glass leaf beads. They have really neat ones that come on 16 inch strings too, but they are more expensive. I bought in bulk.
7. Fringe Beads to make the grapes.
These are a special type of bead called a "fringe bead." The hole is not in the center of the bead; it's off to one side. I bought small tubes of fringe beads in a variety of colors.

8. Tiny green Seed Beads to use on the vines.
Now let's get to it!
How to Make Wine Glass Charms that Look Like Bunches of Grapes
Step 1. Cut Memory Wire
The first step is to cut 5 [or however many wine glass charms you want in your set] rings out of the memory wire.
The key though, is to make sure that you leave enough extra wire to be able to fold the edges over at the end. I made my cuts every 1 ¾ coils.

This is the result. 5 small coils of memory wire, that are actually 1 ¾ rotations each.

Step 2. Cut 5 pieces of the green zebra wire.

Don't use a scissors to cut the wire. I've done it plenty and learn from me. It'll ruin your scissors. Luckily, my needle nose pliers has a special wire cutter part in the center of it. My other pliers was more flimsy and the wire cutter part was weak - the wire dented that too. Look for pliers meant to cut wire.
I usually overestimate the length I'll need for the zebra wire and have some leftover that I snip off. I really should just measure it so I don't waste it, but oh well.
I'd estimate you'll need about 18-20 inches.
Step 3. Count out 50 Fringe Beads.

Count out 50 of the fringe beads that you'll be using for this charm.
Step 4. String them into the zebra wire.

Step 5. Twist into a Bundle of Grapes Shape.

5a. Once all of the 50 fringe beads are on the wire, fold the zebra wire in half.
Pinch the bottom of the V of beads together, and twist.
You twist the beads around each other to create an S, or spiral shape.
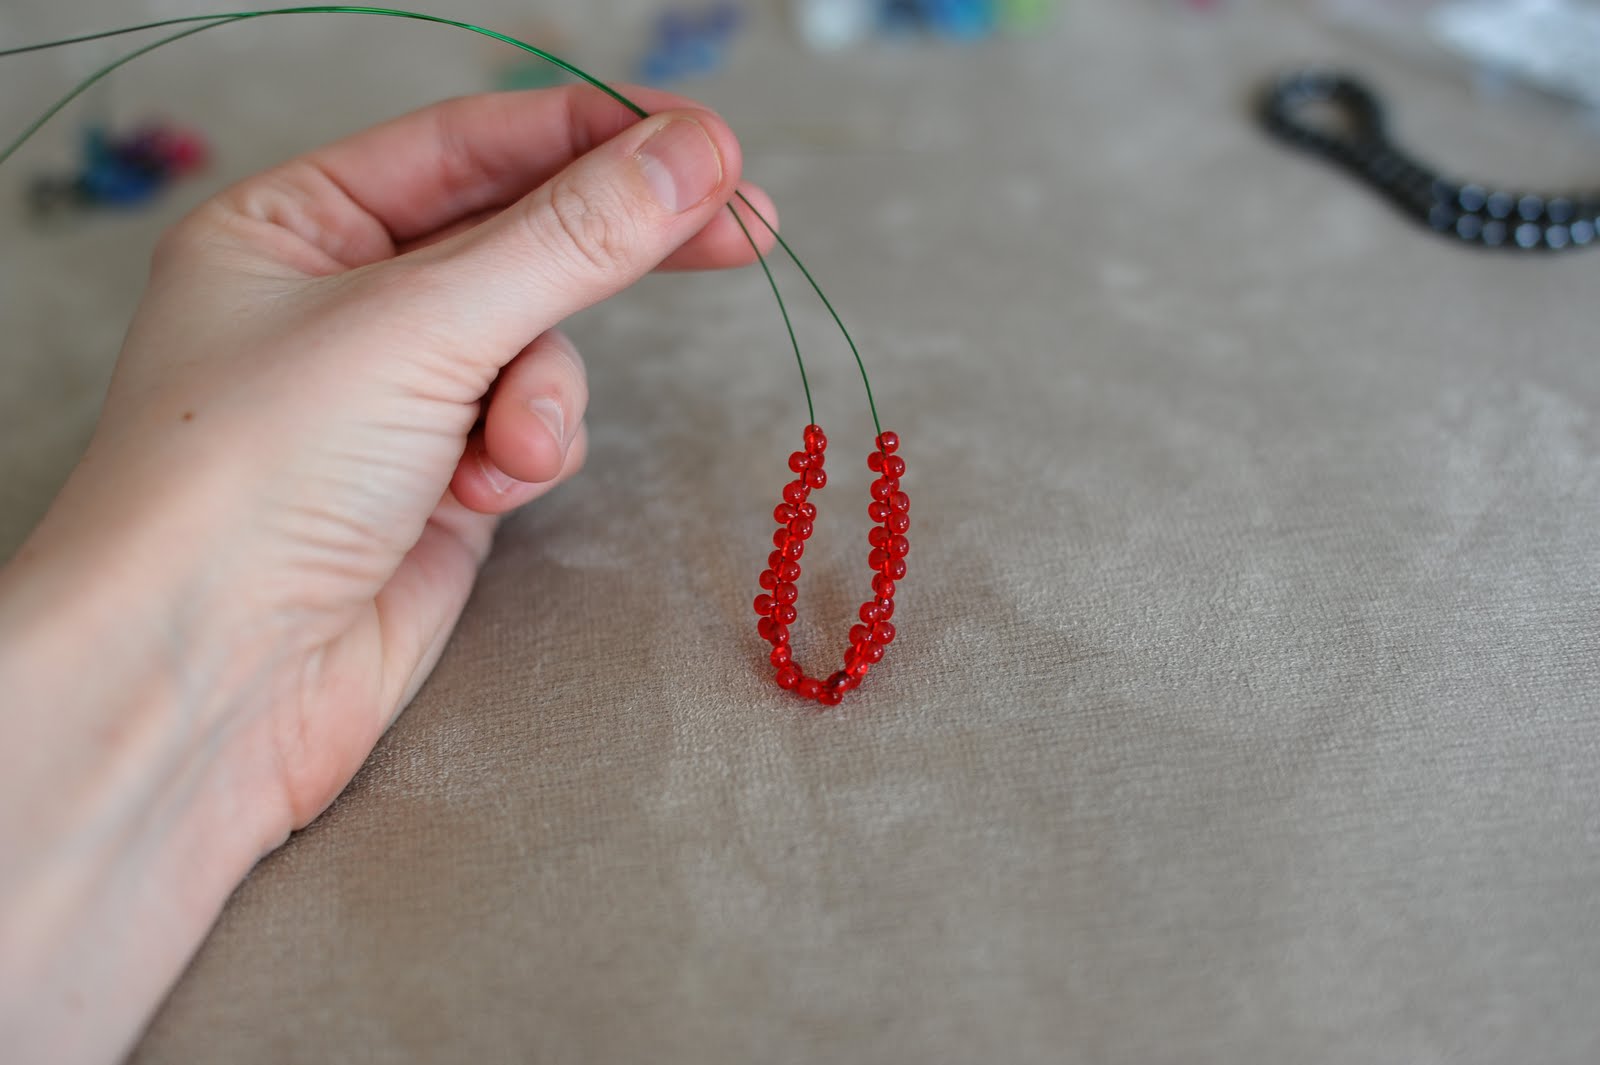
Just like a bundle of grapes!
Step 6. Twist Green Wire to Make a Stem
After you twist the beads into a grape shape, twist the green wire around itself to create a stem.

Once the wire is twisted, use your needle and wrap the stem around it, creating a little loop at the top of your grape cluster.

Wrap the long ends of the green wire around the loop you just created, right above the cluster of grapes a couple times, leaving the green wire ends hang free. The end result will be a little loop (I'm holding onto the loop in the photo below) at the top of the bundle of grapes.
Step 8. Add Leaves


String two little green seed beads onto each of the two green wire ends, and then string a leaf onto each side, like the photo below shows.
Step 9. Curl Wire to Make Vines

Next, I take my needle and stick it into the hole in the leaf bead. This helps me keep it in place while I wind the green wire around it.
Wind the green wire around the needle. I wind it tight at first, then do a couple of spaced/looser twists, and then tight again.
Then once I've done about an inch and a half of twisting, I clip off the extra.
Repeat on the other side.

You can twist these little vines into whatever shape you think looks good.
See, it's so cute already!?!
Step 10. Attach Memory Wire and Magnetic Beads to Charm

Next, slip one of the coils of memory wire through the green hole you created on top of your grape bundle.
Then, slip a magnetic bead onto each end of the memory wire coil. When you're done, the magnetic beads will hook together and help each other to stay in place.

Then, taking the needle nose pliers, grab each end of the memory wire coil and twist the end under, into a tiny loop. The goal is to prevent the magnetic bead from sliding off the end of the coil.
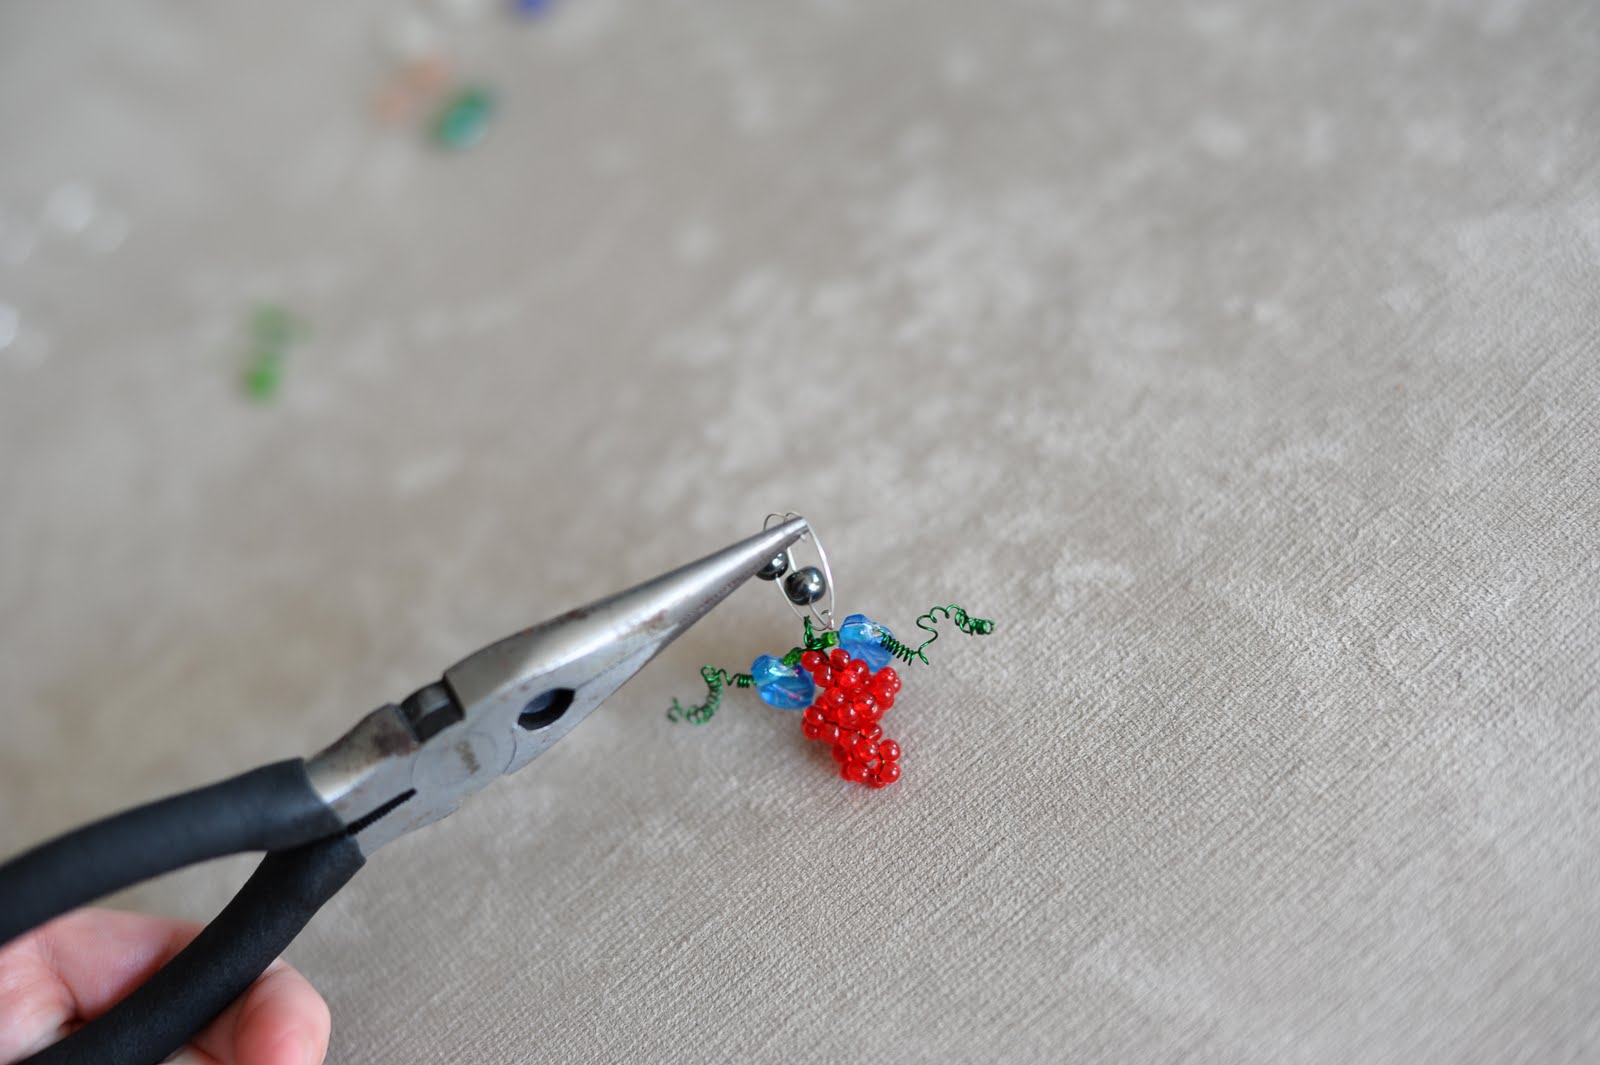
The final product will have each end of the coil twisted under, with the beads above that.
See?? That's it!

Repeat with whatever combination of fringe beads and leaves for as many charms as you want to make!
Viola! You have a set of dainty, darling wine glass charms that will spruce up your own wine glass collection. They also make wonderful gifts!

Enjoy this project!
If you make some of these, I'd love to see the finished product!
xo!
Laura

– If you liked this post, I would love if you would share it on Pinterest or Facebook. Thanks & xo! –



Laura
Hi Becky! I hope you check back and see this reply! Thank you for reading and for the message!
I am very sorry but I am not sure of the colors I ordered for the grapes. I have ordered fringe beads multiple times and have tried out different colors each time. My supply is out now, so I have nothing to check or reference. I typically like to pick 4 or 5 totally different colors though, so when people are using them on their glasses, each has a very different color. A red, blue/purple, yellow, clear maybe?
Also, as far as I know, they are not mini fringe beads - I believe they are just called plain ol fringe beads.
I'm not sure if I mentioned this in the tutorial or not, but I ordered all of my beads from Fire Mountain! I hope that helps! If you have other questions, email me at lauraradniecki@gmail.com!
Happy Crafting!
Laura
Anonymous
Hi,
These are just awesome! Would you please share what color beads you used for the grapes? I've been exploring directions for making wine charms as stocking stuffers for our grown kids. I was going to make grapes out of clay but I like this so much better!
Also, did you use the fringe beads or the "mini" fringe?
Thank you for sharing!
Becky