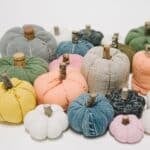
How to Make Fabric Pumpkins
Learn how to make fabric pumpkins out of old, recycled clothes or fabric scraps in this step-by-step photo tutorial! They're perfect for your fall home decor!
Materials
- Fabric or Old Clothes
- Sewing Machine (or Needle & Thread)
- Embroidery Needle & Floss (in complementary or coordinating colors to the fabric)
- Poly-fil
- Wooden Stick or Branch
- Garden Clippers
- Scissors, Hot Glue Gun
Instructions
- Cut fabric into a rectangle. You can experiment with different-sized rectangles, but the fabric pictured here is 12"x7".The longer the length of the fabric, the bigger the diameter your pumpkin will have. The taller the height of your fabric rectangle, the taller your fabric pumpkin will be.PRO TIP: Make pumpkins with different-sized fabric rectangles so you'll have a variety to display!
- Fold the fabric in half, so the right sides are together.We took the lefthand 7" edge and brought it over to the righthand 7" edge.
- Sew a vertical line along the raw edges; the white-thread seam runs vertically along the right vertical edge of the fabric.You now have an inside-out tube.
- Gather the bottom edge of the tube together, folded like an accordion. PRO TIP: Before starting this step, if you are using a shirt sleeve or the tube of a sock for your fabric, make sure they are inside out.
- Sew along the bottom of the accordion.
- Turn the fabric right side out. This gathered area is the bottom of your pumpkin.
- Fill the pumpkin up with Poly-fil or other stuffing of choice.
- Next, you want to close up the top of the pumpkin. You can do this by stitching a loose running stitch around the outer edge and pulling the strings to cinch it down as we did in this post about embroidery.Or, you can gather two opposite sides together, then the two opposite ones, and continue bringing folds of the fabric together toward the middle until you've secured them all, as is pictured below.
- Use whatever method you need to, to close up the top of your pumpkin. Pull tight so the top is securely closed.DO NOT tie off your embroidery floss yet.
- Take the needle and floss, and lay it along the outside of the pumpkin. Push the needle up from the bottom of the pumpkin, and out through the top.You might need to flatten the pumpkin as you do this, depending on how long of a needle you are using.
- Pull the needle out the top of the pumpkin, and pull all the slack out from the embroidery floss.As you pull it tight, the embroidery floss will tighten and create an indented section along the outside of the pumpkin.These cute indentations are what turn a plain fabric ball into a fabric pumpkin!
- Go around the pumpkin, to the bottom, and push the needle up through the top of the pumpkin again, this time directly opposite where you did the first one.Pull it tight, and you should have two indented sections in your pumpkin, across from each other.Repeat until you have divided the pumpkin into 6 evenly spaced sections with indentations.
- Once you have completed all 6 sections, tie a knot in the embroidery floss and clip loose ends.You have completed the fabric portion of your pumpkin!
- Cut a branch or wooden stick into small sections to use as pumpkin stems.Depending on the thickness of your branch, you can use garden clippers or scissors.Hot glue the stem onto the fabric pumpkin, and you are done!
Notes
- You can use any type of fabric to make these easy DIY fabric pumpkins. You can use old fabric scraps, new fabric from the store, old clothing from your own closet or the thrift store, or even old favorites from your kids or loved ones.
- You can skip steps 1-3 if you use a shirt sleeve or a tube sock to make your pumpkins!
- Experiement with different-sized fabric rectangles to make pumpkins of different shapes and sizes!