How to Stencil the RIGHT Way
Learn how to stencil the right way with this tutorial that shows the stencil basics for crafts. Awesome tips for stenciling to help you master your projects!
Materials
- Stencil (I love the stencils at Stencil Revolution)
- Tape
- Stencil Brush
- Acrylic Paint
- Paper Towel or Paper Plate
- Repositionable Spray Stencil Adhesive
Instructions
- Using repositionable spray adhesive or tape, decide where you want to place your stencil and anchor it.You don't want it to move around while you're stenciling.
- Add a small amount of paint to your stencil brush.This is the KEY to stenciling and is the difference between a successful or failed project.You do not want to use too much paint at one time. Too much paint will cause it to seep and bleed underneath the stencil.
- Then use a paper plate or paper towel to dab off the excess.(It's much better to err on the side of less paint than too much.)
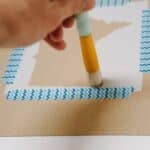
- Once you've dabbed any excess paint from your brush off onto a paper towel or paper plate, it's time to stencil.Using an up-and-down vertical dabbing motion, you want to dab paint into the stencil area.Go slow, reapplying paint to your brush as needed.Every time you add new paint to your brush, dab it onto the paper plate or paper towel before you touch it to the surface you are stenciling.Make sure you are dabbing in an up-and-down vertical motion, NOT sweeping side to side. You don't want to push any paint underneath the edge.
- Continue dabbing paint vertically onto your surface until it's all covered.PRO TIP: As you go around the stencil's edges, it helps to push down on the stencil's edge with your finger so the paint doesn't go underneath. This might not be necessary if you use an adhesive spray, but if you use tape, pressing down on the edge will help you get clean, crisp edge lines.
- You should be stenciling with very little paint each time, so you will have to do multiple coats to cover everything well.I often end up doing three coats of paint, letting them dry in between.Resist the urge to put too much paint on at one time to go faster. I made this mistake and my end result looked sloppy because so much paint seeped underneath the stencil.The key to a great stencil is to use very little paint at once, and do multiple coats to build up to the look you want.
- Once the paint is dry, peel off the tape, and remove your stencil.If you used adhesive spray, carefully peel the stencil off. If any adhesive remains on the surface, you can remove it with your finger or a piece of tape to help pull up the sticky residue.
- You can also layer stencils on top of each other, once the bottom layer is dry.
Notes
- Use repositionable stencil adhesive if you have a ventilated space to work in, or else tape your stencil down onto the surface you want to stencil.
- Blot off most of the paint from your brush before you stencil. You want very little paint for each coat.
- Dab in a vertical up-and-down motion to avoid pushing paint underneath the edges of the stencil.
- Do multiple coats of very little paint to achieve a beautiful, precise stencil.