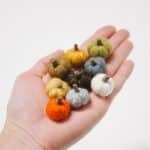
How to Make Mini Felt Ball Pumpkins
Learn how to make mini felt ball pumpkins for your DIY Fall decor this year. They are easy to make, a great fall kids' craft idea, and so cute!
Materials
- Felt Ball I like 20mm balls the best!
- Embroidery Needle
- Embroidery Thread
- Wooden Branch
- Scissors, Hot Glue Gun, and Hot Glue
Instructions
- Thread an embroidery needle with embroidery floss that matches the color of the felt ball you are making into a pumpkin, and knot one end.Start at the bottom of the felt ball, and push the needle up to the top.(A thimble might be helpful, or you can use a flat tabletop to help you push the needle through the felt ball.)Pull all the slack floss through the top, until the knot is snug against the bottom of the ball.
- Take the needle and go back to the bottom of the felt ball where you just inserted it, and push it through to the top again.
- Pull the slack out from the top of the felt ball.As you pull tighter, you will see an indentation form on the side of the felt ball from the embroidery floss.(This is how to turn a felt ball into a pumpkin; you will make 6 evenly spaced indentations along the ball to make it look like a pumpkin.)
- Bring the needle back to the bottom of the ball again, and push it up through the top again.Position the floss directly across from the first indentation, before you pull the slack all the way out.
- This will create another indentation directly across from the first one.
- Repeat this process of pushing the needle into the bottom of the felt ball, up to the top, pulling the slack, and creating another indentation in the side of the pumpkin, until you have 6 evenly spaced sections.
- Once the pumpkin has all 6 indentations, secure the embroidery floss, tie a knot, and trim any loose ends.
- Cut a small wooden branch into sections for the pumpkin stems.
- Hot glue the stem onto the top of the mini felt ball pumpkin. Hold it in place until the glue dries. Repeat for all of the pumpkins.
- You can add a small green fabric leaf if you want to make it look a little more realistic.
- You could also make a beautiful fall garland by stringing the felt pumpkins onto embroidery floss or thin twine (we used gold embroidery floss, and added some felt ball acorns!)
Notes
- I prefer 20mm felt balls because they're the perfect size - not too big and not too small. You can buy then anywhere but I prefer to buy them on Amazon.
- Pick embroidery floss colors that match the felt ball colors if possible - or as close as you can get. This will make the mini pumpkins look as realistic as possible.
- If you don't have a stick or tree branch to cut for pumpkin stems, you can make tiny stems out of clay, or even trim an apple stem and use that! (Although craft stores everywhere carry sticks!)