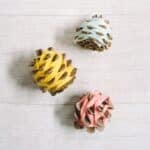
How to Make DIY Yarn-Wrapped Pine Cones
Looking for easy pine cone crafts to make? Here's how to make DIY yarn-wrapped pine cones that look great in a centerpiece, on display, or as an ornament!
Materials
- Pine Cones
- Yarn
- Scissors
Instructions
- Tuck one end of the yarn into pine cone, or wrap it carefully around a prong on the pine cone.
- Carefully wrap the yarn around the pine cone, between the rows of prongs, so that you are filling all of the crevices.Move from the base to the top of the pine cone as you wrap.
- Once you get to the top, continue back down toward the base.The more you wrap, the fuller the pine cone will get and the better it will look.
- Secure the end of the yarn at the pinecone's base.Typically, pine cones have prongs that aren't fully open at their bases. Use these tight crevices to your advantage.I slid the end of my yarn into one of the crevices in the base of the pine cone to secure, and trimmed off any excess.You can always use a small dab of hot glue to anchor the second end of your yarn too, if you don't like tucking it in.
Notes
- Medium-weight yarn works great because it's easy to hold and wrap. Plus, it's usually the cheapest and comes in the widest range of colors!
- The more you wrap, the fuller the pinecones will become and the better they will look.
- This is a great craft to help kids practice their fine motor skills!