How to Make DIY Beeswax Yarn Sticks
Learn how to make DIY Beeswax Yarn Sticks with our simple step-by-step guide. Bring this versatile and natural craft material into your DIY projects!
Materials
- Beeswax
- Saucepan or Crockpot
- Stovetop, Double Boiler, Hot Plate
- Yarn
- Scissors
- Tongs
- Parchment Paper
Instructions
- Slowly melt beeswax in a pan or crockpot on LOW heat.Beeswax has a low melting point and can be volatile and flammable at high heat.Melt the beeswax slowly and carefully.PRO TIP: Buy a pan or crockpot at a thrift store or garage sale. After you use it to melt beeswax once, it will forever be your beeswax pot because you'll never get the beeswax off.
- Cut sections of yarn.I cut sections of yarn that were about 8"-9" long.
- Once the beeswax is completely melted, carefully place the pieces of yarn into the wax, one at a time.The yarn may sizzle and bubble in the wax as any air bubbles escape. This is normal.
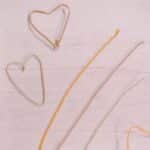
- Once it's done bubbling, carefully remove the yarn with tongs and lay it out flat onto parchment paper to cool and harden.Repeat for all pieces of yarn.Once the yarn sticks have hardened, they're ready for playing!
Notes
- Check garage sales or thrift stores to buy a "beeswax-melting only" pot or pan. Or better yet, get an old crockpot that is a pot and a heating source in one!
- I like tongs with silicone tips the best because the beeswax peels right off.
- Once the beeswax yarn cools and hardens, it's ready to bend into shapes! You can practice letters, numbers, and shapes with the yarn sticks, or make different designs with them.