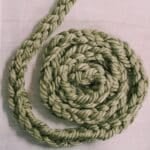
How to Finger Knit using Yarn (The Two Finger Technique)
Learn how to finger knit with yarn using the two-finger knitting technique in this easy step-by-step tutorial. All you need is some yarn and your hands!
Materials
- Yarn
- Scissors
- Your Hand
Instructions
- Begin with the tail end of the yarn pinched between your thumb and the side of your hand, as pictured below.Bring the yarn around the front of your pointer finger, and then behind your middle finger.
- Bring the yarn around the back of your middle finger, and then wrap it back around the front of your middle finger and behind your pointer finger.
- Bring the yarn around the back of your pointer finger, to the front of your pointer finger, and then to the back of your middle finger again.
- Bring the yarn around the backside of your middle finger, across the front side of your middle finger again, and let the yarn rest down back, in between your pointer and middle fingers.
- On one finger, lift the yarn section that is closest to the base of your finger up and over the top section of yarn, and up off of your finger to the backside of your hand.You will only have one section of yarn left on that finger now.
- Repeat this same process on the other finger.
- You'll be left with only one section of yarn on each finger.Pull the yarn tail behind your hand gently to tighten things up.
- Repeat the same process - wrap the yarn around the backside of your pointer finger, across the front of the pointer, behind the middle finger.
- Around the outside of the middle finger, and then across the front of the middle finger again.The yarn will rest between the pointer and middle fingers, toward the back of your hand.The process of finger knitting is similar to making a "figure 8" around your fingers.
- Then lift the lower section of yarn closest to the base of each finger up and over the top section, off the tip of each finger toward the back of your hand.
- Repeat to make each "stitch" and pull on the yarn tail to tighten the finger knitting as you go.You'll see the beautiful finger knitting start to take shape!
- To finish your finger-knitting project, cut the yarn from the skein, leaving a small tail - 12" long or so.Thread the end of the yarn tail underneath one yarn section on your finger.Pull tight.
- Thread the yarn tail under the section of yarn on your other finger, and pull tight.
- Slide the yarn off your fingers and pull the yarn tail tight to snug up the end of the finger knitting.It should close up the end in a knot.The finger knitting is complete!
Notes
- You can use any type of yarn or string for finger knitting. Yarn, string, rope, ribbon, cording, and handmade t-shirt yarn are all great options!
- I like using chunky yarn the best because it's fast and easy to finger knit with, and I also love using recycled t-shirt yarn because it's eco-friendly and makes me feel good to repurpose something destined for the garbage!
- This is a fun craft project for adults and kids alike!