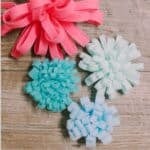
How to Make Felt Mum Flowers
Learn how to make DIY felt mum flowers in this easy craft tutorial. All you need to make them is felt, scissors, and hot glue. Follow along as we make different versions of beautiful felt mums in this quick step-by-step tutorial!
Materials
- Felt
- Scissors
- Hot Glue Gun and Glue
Instructions
- Cut felt into a rectangle.Our blue rectangle is 3" by 12".
- Squeeze hot glue along the rectangle's top, long edge.
- Fold the bottom, long edge up, and press it into the line of hot glue to secure it.You'll now have a felt strip that is 1.5" by 12".
- Start at one end of the felt strip, and make small cuts from the folded bottom toward the glued top - stopping before you get to the glue line.You are making a fringe along the bottom.
- Continue cutting fringe along the whole length of the felt.These cuts are roughly ⅜" apart.
- Put a section of hot glue along the top edge of the fringe.
- Begin rolling the felt. Hold it securely so the glue can dry.
- Add more glue, and keep rolling the felt strip up.
- Secure the end of the felt strip with hot glue so it doesn't unravel.
- The felt mum flower is done!
Notes
- You can use any type of felt from cheap craft store versions to high-end wool felt. As long as it's pliable and can be folded and rolled into flower shapes, it will work!
- You can change the look of the mum flower by cutting fringe of different widths. Try ¼" or ⅛" and see how different the mums look.
- You can also change the size of the felt rectangle you start with, to change the look of your mums.
- Use your DIY felt mums in table or shelf decor, string together for a garland, use as gift wrap embellishments, or hot glue to headbands or barrettes as hair accessories!